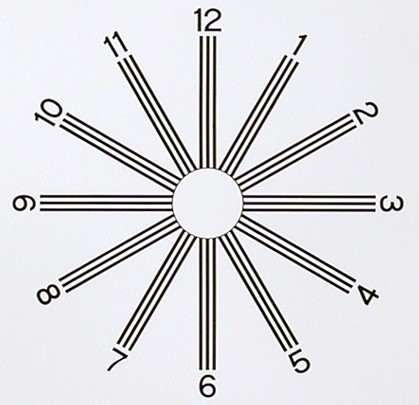
It consists of a series of the number of lines of equal length from the center and pointing towards a number similar to the face of a clock. Gaps between two numbers are equal to 30 degrees.

Before reading procedure read optics behind Astigmatism clock dial test
Astigmatism clock dial test Procedure:
- It is the monocular procedure. Occlude LE of the patient.
- Step 1: Determine the patient’s Best vision sphere and record visual acuity.
- Step 2: Add plus power (equal to half of approximated cylinder power depending upon patient visual acuity shown in Table 1). At this point, the patient should have one set of lines in the chart more clearly compared to others, if not add more plus power. Or fog patient using plus power until all lines in the astigmatic fan chart appear to blur and slowly reduce plus power in 0.25 D step till one set of lines becomes clear compared to the other.
- Step 3: Most astigmatism chart dials feature numerals that resemble those found on the face of a traditional clock. The patient is questioned “Which set of lines is more clear?” and is expected to respond in numbers which will be marked on the chart dial (e.g. line pointing towards 1 and 7 o’clock or 2 and 8 o’clock or 3 and 9 o’clock or 6 and 12 o’clock.
- Step 4: To determine correcting cylinder axis, a smaller number out of two numbers is selected which is reported by the patient (if the 1 and 7 o’clock line is clear then 1 o’clock is selected) and a smaller number is multiplied by 30 degrees. {The reason behind taking a small number is, the clock dial astigmatism chart represents the axis in 360 degrees. But in clinical practice axis is represented at 180 degrees and any axis above 180 degrees is equal to Axis – 180 degrees. The reason for multiplication by 30 is, the gap between two numbers is equal to 30 degrees. (As a whole astigmatic clock dial circle represents 360 degrees and the total number written on the dial is 12 which is equally divided from one another. This mean difference between two numbers is equal to 360/12 = 30 degrees)}
- Step 5: The examiner then starts adding a minus cylinder lens and simultaneously keeps questioning about equal clarity of lines. The examiner continues adding a minus cylinder lens until the patient report all line are equally clear.
- Step 6: The examiner adds an extra 0.25DC to see a reversal. At this point a set of lines which is 90 apart or perpendicular from the line was clear in step.
- Step 7: Remove the extra 0.25 DC which was added in step 5. Note down the final power of the patient.
- Step 8: Repeat the same procedure for the other eye.
| Vision with COLC on retina | Astigmatism (D) |
| 6/6 | Less than 1 |
| 6/9 | 1.00 |
| 6/12 | 1.50 |
| 6/18 | 2.00 |
| 6/24 | 3.00 |
| 6/36 | 4.00 |
| 6/60 | High |
Lecturer (Nethradhama School of Optometry)
Moptom

